This One Mistake With Spiral Ham Cooking Time Will Ruin Your Thanksgiving!
Have you ever wondered why your holiday ham turned out dry, tough, or completely disappointing despite following what you thought were the right instructions? The truth is, there's one critical mistake that countless home cooks make when preparing spiral ham, and it's costing them the perfect centerpiece for their Thanksgiving feast. This simple error can transform what should be a juicy, flavorful masterpiece into a culinary disaster that leaves your guests reaching for extra gravy or, worse, silently regretting their RSVP.
The mistake? Overcooking your spiral ham by just a few minutes. Unlike traditional hams that come as a solid piece, spiral-cut hams are pre-sliced, which means they cook faster and are more susceptible to drying out. That precious window of perfect doneness is narrower than you might think, and missing it by even 10-15 minutes can result in meat that's tough, chewy, and lacking the moisture that makes ham so irresistible. But don't worry—by the end of this guide, you'll know exactly how to avoid this pitfall and serve a ham that will have your guests raving long after the last slice is gone.
Understanding Your Spiral Ham
Spiral hams have become increasingly popular for holiday meals because they offer convenience and even cooking. These hams come pre-sliced in a spiral pattern, making serving much easier than with traditional hams. However, this convenience comes with a caveat: the pre-slicing means the meat is more exposed to heat, causing it to lose moisture more quickly during cooking.
The key to perfect spiral ham lies in understanding that it's typically already cooked when you purchase it. Most spiral hams are smoked or cured, meaning your primary goal is to reheat it gently while adding flavor through glazing and maintaining moisture. This is where many people go wrong—they treat it like raw meat that needs thorough cooking, when in reality, you're just warming it through.
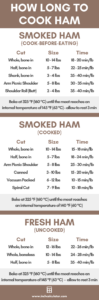
Temperature control is crucial. The ideal internal temperature for a reheated spiral ham is between 140°F and 145°F. Going beyond this range, even by just 10 degrees, can start the drying process. Using a reliable meat thermometer is non-negotiable if you want to achieve ham perfection.
The Perfect Cooking Timeline
Timing is everything when it comes to spiral ham, and having a clear cooking timeline can make the difference between success and disappointment. For a standard 10-pound spiral ham, you're looking at approximately 10-12 minutes per pound in a 325°F oven, but this is just a starting point.
- Elijah Schaffers Sex Scandal Leaked Messages That Will Make You Sick
- Skin Club Promo Code
- Bernice Burgos Shocking Leaked Video Exposes Everything
Here's a more detailed breakdown: Preheat your oven to 325°F. Place the ham cut-side down in a roasting pan and add about 1/2 cup of liquid (water, broth, or juice) to the bottom of the pan. Cover the ham tightly with aluminum foil to trap moisture. Calculate your cooking time based on weight—a 10-pound ham would need roughly 100-120 minutes.
The critical moment comes in the last 20-30 minutes of cooking. Remove the foil, apply your glaze, and let it caramelize. This is where many people make their fatal error—they get impatient and either apply the glaze too early (causing it to burn) or leave the ham in too long after glazing. The ham should only be uncovered for the final 20-30 minutes, just long enough to let that beautiful glaze set without drying out the meat.
Common Mistakes to Avoid
Beyond overcooking, several other common mistakes can sabotage your spiral ham efforts. One major error is not letting the ham come to room temperature before cooking. Taking a cold ham directly from the refrigerator to the oven can result in uneven cooking, with the outside drying out before the center reaches the proper temperature.
Another frequent mistake is using too high an oven temperature. While it might seem logical to crank up the heat to speed things along, high temperatures are the enemy of moist ham. Low and slow is the mantra for spiral ham success. Temperatures above 350°F can cause the exterior to cook too quickly, sealing in moisture that should be gradually released and reabsorbed.
Skipping the resting period is another critical error. After removing your ham from the oven, let it rest for 15-20 minutes before carving. This allows the juices to redistribute throughout the meat. Cutting into it immediately means those precious juices will run out onto your cutting board instead of staying in the ham where they belong.
Glazing Techniques for Maximum Flavor
The glaze is what transforms a good ham into an unforgettable one, but applying it correctly requires timing and technique. Many people make the mistake of glazing too early in the cooking process, which results in a burnt exterior and underwhelming flavor.
For optimal results, prepare your glaze while the ham is cooking. Traditional options include brown sugar and mustard, honey and butter, or more adventurous combinations like pineapple and bourbon. About 20-30 minutes before the ham is done, remove it from the oven and generously brush on your glaze, making sure to get it into all the spiral cuts.
Return the ham to the oven uncovered for the final cooking period. The glaze should bubble and caramelize but not burn. If you notice the glaze darkening too quickly, you can loosely tent the ham with foil again. For an extra glossy finish, you can apply a second layer of glaze during the last 10 minutes of cooking.
Side Dishes That Complement Your Ham
While your ham is the star of the show, the right side dishes can elevate your entire meal. Classic pairings include scalloped potatoes, which benefit from the ham's savory juices, and green bean casserole for a touch of freshness. Sweet potato casserole with marshmallows provides a delightful contrast to the salty ham.
Consider also including dishes that can be prepared ahead of time, reducing stress on the big day. Mac and cheese, cornbread dressing, and cranberry sauce are all excellent make-ahead options. Remember that your side dishes should complement, not compete with, the ham's flavor profile.
For a more contemporary approach, consider roasted vegetable medleys or grain-based salads that can be served at room temperature. This gives you more flexibility with oven space and timing, which is crucial when preparing a large holiday meal.
Troubleshooting Common Issues
Even with the best preparation, things can sometimes go awry. If you find your ham is cooking too quickly, you can lower the oven temperature by 25 degrees and extend the cooking time slightly. Conversely, if it's not reaching temperature quickly enough, you might need to increase the heat slightly, but be very careful not to overshoot.
If your ham seems dry despite your best efforts, you can create a quick rescue sauce by simmering the pan drippings with a bit of broth and cornstarch to create a gravy. This won't completely restore moisture to the meat but can certainly help improve the eating experience.
For those who like to prepare ahead, you can cook the ham a day in advance and reheat it gently. To do this, slice the ham and arrange it in a baking dish with a bit of broth, then cover tightly with foil and warm in a 325°F oven until heated through. This method actually helps prevent overcooking since you're only warming pre-cooked slices rather than cooking a whole ham.
Storage and Leftover Strategies
One of the best parts of cooking a holiday ham is the abundance of leftovers that follow. Proper storage is key to maintaining quality. Allow the ham to cool completely before refrigerating, and store it in airtight containers or tightly wrapped in plastic wrap.
Leftover ham can be safely stored in the refrigerator for 3-5 days. For longer storage, ham freezes exceptionally well. Wrap it tightly in plastic wrap, then aluminum foil, or use freezer bags, removing as much air as possible. Frozen ham maintains best quality for about 1-2 months, though it remains safe to eat beyond that timeframe.
The versatility of leftover ham is one of its greatest assets. Beyond sandwiches, consider using it in breakfast dishes like omelets and quiches, incorporating it into pasta dishes, or adding it to soups and casseroles. The smoky flavor of ham can enhance countless recipes, making your holiday investment stretch far beyond the initial meal.
Conclusion
Mastering spiral ham cooking time is truly the difference between a memorable holiday meal and a disappointing one. By understanding that spiral hams cook faster than traditional hams, using a reliable meat thermometer, and following the low-and-slow approach, you can avoid the one mistake that ruins countless Thanksgiving dinners.
Remember that perfection comes with practice, so don't be discouraged if your first attempt isn't flawless. Keep notes on what works for your specific oven and the particular ham you purchase, as slight variations can occur. With these guidelines and a bit of patience, you'll be serving up a spiral ham that's juicy, flavorful, and worthy of being the centerpiece of your holiday table.
The joy of sharing a perfectly cooked ham with family and friends is worth the attention to detail required. After all, holiday meals are about more than just food—they're about creating memories and traditions that last far beyond the final bite. Now that you know the secrets to spiral ham success, you're well-equipped to make this Thanksgiving one that everyone will remember for all the right reasons.