How To Remove Gel X Nails At Home: A Complete Guide
Have you ever found yourself staring at your gel x nails, wondering how to remove them without damaging your natural nails? You're not alone. Many people struggle with the removal process, especially when trying to do it at home. Gel x nails are incredibly popular for their durability and beautiful finish, but when it's time for a change, knowing the proper removal technique is essential. In this comprehensive guide, we'll walk you through everything you need to know about safely removing gel x nails at home, saving you both time and money.
Understanding Gel X Nails
Gel x nails are one of the easiest ways to create really durable nail extensions. Unlike traditional acrylic nails, gel x nails use a combination of gel polish and nail extensions that create a lightweight, natural-looking finish. They're known for their flexibility and strength, lasting up to three weeks or more with proper care. However, their durability is also what makes them challenging to remove.
But sadly they can be a bit difficult to remove especially if you are not accustomed to removing extensions at home. The gel formula adheres strongly to your natural nails, and improper removal can lead to nail damage, thinning, or even infections. This is why understanding the correct removal process is crucial for maintaining healthy nails.
Preparing for Removal
Before you begin the removal process, it's important to gather all necessary supplies. You'll need:
- 100% acetone
- Cotton balls or pads
- Aluminum foil
- Nail file or buffer
- Cuticle pusher or orange stick
- Cuticle oil
- Hand cream
- Bowl for soaking
- Nail clippers
Keep your nails strong and healthy with proper nail care tips! This preparation phase is crucial because it sets the foundation for a successful removal process. Make sure you're working in a well-ventilated area, as acetone fumes can be strong.
Step-by-Step Removal Process
Filing Down the Top Layer
Start by filing down the shiny top coat of your gel x nails. This step is essential because it allows the acetone to penetrate the gel more effectively. Use a coarse nail file and gently buff the entire surface of each nail until the shine is completely gone. Be careful not to file too deeply into the gel layer, as this could damage your natural nails underneath.
- Twitter Porn Black
- Twitter Erupts Over Charlie Kirks Secret Video Leak You Wont Believe Whats Inside
- Merrill Osmond
Soaking Method
There are two main methods for removing gel x nails: the soaking method and the foil method. The soaking method involves filling a bowl with acetone and submerging your fingertips for 15-20 minutes. This method is gentler but requires more patience.
Learn how to remove gel x nails at home using this technique by ensuring your nails are fully submerged in the acetone. You may need to reheat the acetone or add more if it starts to cool down during the process.
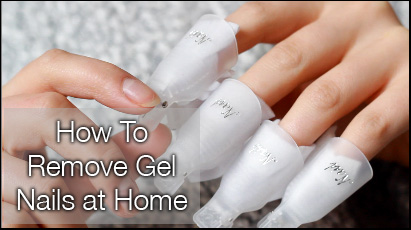
Foil Method
The foil method is often preferred because it's more efficient. Cut aluminum foil into small squares and soak cotton balls in acetone. Place the soaked cotton balls on your nails, then wrap each fingertip with foil to secure them. This creates a mini sauna effect that helps break down the gel more quickly.
Inside, learn how to remove gel extensions at home to save time and money. The foil method typically takes 15-20 minutes, depending on how many layers of gel you have.
Expert Techniques for Safe Removal
Learn how to remove gel x nails safely at home without damage by following these expert-recommended steps:
Be patient: Rushing the process is the most common mistake people make. If the gel isn't lifting easily after the recommended time, rewrap and wait a few more minutes.
Use gentle pressure: When the gel starts to lift, use a cuticle pusher to gently scrape it off. Never force or pry the gel off, as this can damage your natural nails.
Work systematically: Remove one nail at a time, ensuring you don't leave any gel residue behind.
Wondering how to safely remove gel nail polish at home? We asked three nail experts to break down the six steps and products you need to get the job done.
Post-Removal Nail Care
Once you've successfully removed all the gel x nails, your natural nails will need some TLC. The acetone can be very drying, so it's important to rehydrate and nourish your nails and cuticles.
Luckily, we're here to help with these post-removal care tips:
- Apply cuticle oil generously to your nails and surrounding skin
- Use a rich hand cream to restore moisture
- Consider using a nail strengthener for a few weeks
- Give your nails a break before applying new polish or extensions
We have all the best methods to remove the gel layer and reveal your natural nails once again, plus how to moisturize and nourish them to prevent damage.
Common Mistakes to Avoid
Many people make the same mistakes when removing gel x nails at home. Here are some pitfalls to watch out for:
Peeling or picking: Never peel or pick at gel nails, as this can remove layers of your natural nail along with the gel.
Using non-acetone removers: Regular nail polish remover won't effectively remove gel x nails. You need 100% acetone for the best results.
Skipping the filing step: Not filing the top coat can significantly increase removal time and make the process more difficult.
Rushing the process: Trying to speed up removal by scraping too aggressively can cause serious nail damage.
Alternative Removal Methods
If you're looking for gentler alternatives, consider these methods:
Gel removal kits: These kits contain specialized tools and solutions designed specifically for gel nail removal.
Professional removal: If you're unsure about removing gel x nails at home, consider visiting a nail salon for professional removal.
Soaking in warm water first: Some people find that soaking nails in warm water before applying acetone can help soften the gel.
Maintaining Healthy Nails
After removing your gel x nails, focus on restoring your nail health. Here are some tips for maintaining strong, healthy nails:
- Keep nails trimmed to prevent breakage
- Use a nail strengthener if your nails feel weak
- Apply cuticle oil daily to keep cuticles hydrated
- Take a break from nail enhancements for at least a few weeks
- Maintain a balanced diet rich in vitamins and minerals
Conclusion
Learning how to remove gel x nails at home doesn't have to be intimidating. With the right tools, techniques, and patience, you can safely remove your gel extensions without damaging your natural nails. Remember that proper preparation, careful execution, and post-removal care are all essential components of the process.
By following the steps outlined in this guide, you'll be able to save time and money while maintaining the health and integrity of your nails. Whether you choose the soaking method or the foil method, the key is to be patient and gentle throughout the process. Your nails will thank you for taking the time to remove your gel x nails properly, and you'll be ready to show off your natural nails or apply a fresh set of enhancements in no time.